Friday, July 29, 2022

Update User Profile in Active Directory B2C in .Net Core web app

In Previous tutorial I explained how to use Azure AD B2C . This tutorial is a continuous part 3 of the previous tutorial. Here I will show how we can add more attribute in user profile and update those from UI .

You can check Previous tutorial how to setup sign in and register user in B2C. Here I will use same app which created for Previous tutorial. I assume that you have already set sign up/sign In project and continue from there.

1. User Flow : First we need to create new user flow to update profile .

Go to B2C directory -> user flow option from left menu -> Add User Flow-> Select Profile Editing and create .


In next screen enter policy name and select required field which you want to see/edit in profile .

you can add more attribute by click show more. 


Copy the policy name from the added user flow list "B2C_1_user_profile"  and open visual studio .

I am using project which create Previous  blog .

Open appsetings.json and add below highlighted config

{
  /*
The following identity settings need to be configured
before the project can be successfully executed.
For more info see https://aka.ms/dotnet-template-ms-identity-platform
*/
  "AzureAdB2C": {
    "Instance": "xxxx",
    "TenantId": "xxxx",
    "ClientId": "xxx",
    "Domain": "xxx",
    "SignUpSignInPolicyId": "B2C_1_singupsing",
    "EditProfilePolicyId": "B2C_1_user_profile", // this line added to update profile
    "CallbackPath": "/signin-oidc" // "/signin/B2C_1_sign_up_in"  // defaults to /signin-oidc
  },
  "Logging": {
    "LogLevel": {
      "Default": "Information",
      "Microsoft": "Warning",
      "Microsoft.Hosting.Lifetime": "Information"
    }
  },
  "AllowedHosts": "*"
}

Go back to _layout.cshtml and add the below link to redirect to profile page

<!DOCTYPE html>
<html lang="en">
<head>
    <meta charset="utf-8" />
    <meta name="viewport" content="width=device-width, initial-scale=1.0" />
    <title>@ViewData["Title"] - AzureB2CExamples</title>
    <link rel="stylesheet" href="~/lib/bootstrap/dist/css/bootstrap.min.css" />
    <link rel="stylesheet" href="~/css/site.css" />
</head>
<body>
    <header>
        <nav class="navbar navbar-expand-sm navbar-toggleable-sm navbar-light bg-white border-bottom box-shadow mb-3">
            <div class="container">
                <a class="navbar-brand" asp-area="" asp-controller="Home" asp-action="Index">AzureB2CExamples</a>
                <button class="navbar-toggler" type="button" data-toggle="collapse" data-target=".navbar-collapse" aria-controls="navbarSupportedContent"
                        aria-expanded="false" aria-label="Toggle navigation">
                    <span class="navbar-toggler-icon"></span>
                </button>
                <div class="navbar-collapse collapse d-sm-inline-flex justify-content-between">
                    <ul class="navbar-nav flex-grow-1">
                        <li class="nav-item">
                            <a class="nav-link text-dark" asp-area="" asp-controller="Home" asp-action="Index">Home</a>
                        </li>
                        <li class="nav-item"><a class="nav-link text-dark" asp-area="" asp-controller="Home" asp-action="MyProfiles">My Profile</a></li>

                        <li class="nav-item">
                            <a class="nav-link text-dark" asp-area="MicrosoftIdentity" asp-controller="Account" asp-action="EditProfile">
                                Edit Profile
                            </a>
                        </li>

                        <li class="nav-item">

                            <a class="nav-link text-dark" asp-area="" asp-controller="Home" asp-action="Privacy">Privacy</a>
                        </li>
                    </ul>
                    <partial name="_LoginPartial" />
                </div>
            </div>
        </nav>
    </header>
    <div class="container">
        <main role="main" class="pb-3">
            @RenderBody()
        </main>
    </div>

    <footer class="border-top footer text-muted">
        <div class="container">
            &copy; 2022 - AzureB2CExamples - <a asp-area="" asp-controller="Home" asp-action="Privacy">Privacy</a>
        </div>
    </footer>
    <script src="~/lib/jquery/dist/jquery.min.js"></script>
    <script src="~/lib/bootstrap/dist/js/bootstrap.bundle.min.js"></script>
    <script src="~/js/site.js" asp-append-version="true"></script>
    @await RenderSectionAsync("Scripts", required: false)
</body>
</html>


Run the application and after sign in click on "Edit Profile" . you will be redirected to Default Edit form where you can update user profile.

Click Sign In and login with your user Id and password


After Login you will be redirected to home page , on home page click on Edit Profile


You will be redirected to default profile update page where you can update profile and continue .


After updating record you will be redirected to previous page .  Similarly you can do password reset feature also. So by this way in less coding you can implement complete user management .

That's It . We have finished the series of Azure B2C .


 you can download all the azure samples code : https://github.com/mkumar8184/azure-sdk-services-samples

Thursday, July 28, 2022

Customize Default Signup/Sign In pages in azure ad B2C

In Previous tutorial I explained how to use Azure AD B2C . This tutorial is a continuous  part of the previous tutorial. Here I will show how we can customize default Pages for sign up/Sign In .

Why to customize: Microsoft provides default page without branding and different theme which may not be match with any company branding /application . So just need to unified and seamless user experience better to customize page.

Default Page :


Customized Signup /Sing In page will look like - of course you can design better than this.


In order to achieve this we need 3 things to do

1. Prepare one html page  with required css/js (can be inline or external css class)
2. Upload in storage or somewhere so it can be accessed from B2C
3. Customize the user flow from default to your html page

1. Html Page : I am creating with inline css if you want you can add external css ref. Also I have used some online customized bootstrap just to make it nicer. But sure you can make it better. Purpose is just to see how can we customize

Html Code :

<!DOCTYPE html>
<html lang="en">
<head>
    <title>Azure B2C change login page</title>
    <meta charset="utf-8">
    <meta name="viewport" content="width=device-width, initial-scale=1">
    <!-- Bootstrap CSS -->
    <link rel="stylesheet" href="https://www.markuptag.com/bootstrap/5/css/bootstrap.min.css">
    <style type="text/css">
        body {
            background-color: #4887e6;
            font-family: Verdana;
            font-size: 14px;
        }
        .bg-light {
           background-color:#dde4eb !important;
        }
        h2 {
            font-size: medium !important;
            color: blue !important;
        }
        #next {
            background-color: #4CAF50; /* Green */
            border: none;
            color: white;
            padding: 15px 32px;
            text-align: center;
            text-decoration: none;
            display: inline-block;
            font-size: 16px;
        }
        button {
            background-color: #4CAF50 !important; /* Green */
            border: none !important;
            color: white !important;
            padding: 10px 20px !important;
            text-align: center !important;
            text-decoration: none !important;
            display: inline-block !important;
            font-size: 14px !important;
            margin: 2px 2px 2px 2px !important;
        }
        input[type=email] {
            width: 100%;
            box-sizing: border-box;
            border: 2px solid #ccc;
            border-radius: 4px;
            font-size: 16px;
            background-color: white;
            background-image: url('searchicon.png');
            background-position: 10px 10px;
            background-repeat: no-repeat;
            padding: 12px 20px 12px 40px;
            margin-bottom: 3px !important;
        }
        .dropdown_single {
            width: 100%;
            box-sizing: border-box !important;
            border: 2px solid #ccc !important;
            border-radius: 4px !important;
            font-size: 16px !important;
            background-color: white !important;
            background-image: url('searchicon.png') !important;
            background-position: 10px 10px !important;
            background-repeat: no-repeat !important;
            padding: 12px 20px 12px 40px !important;
            margin-bottom: 3px !important;
        }
        input[type=password] {
            width: 100%;
            box-sizing: border-box;
            border: 2px solid #ccc;
            border-radius: 4px;
            font-size: 16px;
            background-color: white;
            background-image: url('searchicon.png');
            background-position: 10px 10px;
            background-repeat: no-repeat;
            padding: 12px 20px 12px 40px;
            margin-bottom: 3px !important;
        }
        input[type=text] {
            width: 100%;
            box-sizing: border-box;
            border: 2px solid #ccc;
            border-radius: 4px;
            font-size: 16px;
            background-color: white;
            background-image: url('searchicon.png');
            background-position: 10px 10px;
            background-repeat: no-repeat;
            padding: 12px 20px 12px 40px;
            margin-bottom: 3px !important;
        }
        .buttons {
            margin-top:2px!important;
        }
        ul {
            list-style: none !important;
            padding-inline-start: 20px !important;
        }
        a {
            color: #8caad8 !important;
            text-decoration: underline !important;
        }
       
    </style>
</head>
<body>

    <div class="container">
        <div class="row">
            <div class="col-md-8 offset-md-4">
                <div class="login-form bg-light mt-4 p-4">
                    <h4>Welcome To Azure AD B2C Example</h4>
                    <hr class="mt-2">
                    <div id="api" class="row g-3">

                    </div>

                    <hr class="mt-4">

                </div>
            </div>
        </div>
    </div>

    <!-- Bootstrap JS -->
    <script src="https://www.markuptag.com/bootstrap/5/js/bootstrap.bundle.min.js"></script>
</body>
</html>

Html output will look like  without form .


in the above code you can design based on your branding , header ,footer . only thing that you need to add is below tag .where on render time Microsoft insert required form. Div/section Id must be "api"

 <div id="api" class="row g-3">

</div>


2. Upload html and css file to Storage :  upload this file to my storage 
Go to storage account -> container -> create new container/select existing one-> upload your html file.


Uploaded file :


Go back to storage account and enable CORS to have access this storage file from external place.
Type CORS in search in left top and click ok


Allowed Origins: enter your organization instance/url name 
Method - Get, options
Rest field you can put *  and save .

3. Use in User Flow :
Go to Azure B2C tenants and from left menu click user flow and select B2C_1_singupsing" which you have create in previous part.


Click Page Layout and select 
1. unified signup and sign in 
2. user custom page content - Yes
3.custom page url- need to enter your html file url. to copy the url you can go to the file and click .you will see url which you need to copy


After updating custom page url click on save ,Now you can test your customized page .
To test this either you can run your application or click on "Run User Flow" directly .
And here you go to your pages:

Sign In :

sign Up:


And we are done with customizing the default pages in B2C. 

 you can download all the azure samples code : https://github.com/mkumar8184/azure-sdk-services-samples


Wednesday, July 27, 2022

Azure Active Directory B2C Registration and login in .Net Core Web app

 What : Azure AD B2C is the identity management service to manage external/internal user’s profile ,signup/sign in and get token to use for your application securely without doing a lot of custom development. If you are developing an app for IOS, Android ,SPA and it is customer facing where customer can register himself and use their personal email/company email/social account to sign up and sign in , the Azure AD B2C is the quick and best choice for you.

So Overall process will be-


So, without delaying let’s create Azure AD B2C authenticated app in .Net Core web app.

Just to make simplified I will cover this tutorial in 3 Parts :

Part 1: Configure Azure AD B2C and implement in .Net core web app for signup /sign in

Part 2: Customize Default Signup/Sign In pages .

Part 3:Add Attributes to User Profile other than Default &  Update user profile

Let’s start Part 1 :

Configure Azure AD B2C and implement in .Net core web app for signup /sign in

Steps :

1.      Register Azure Active Directory When you create subscription many services not registered by default. Azure AD is one of them . To register Azure Active Directory,

Go to the subscriptions-> Resource Provider(left menu) -> Search Azure Active Directory -> select and click on Register .


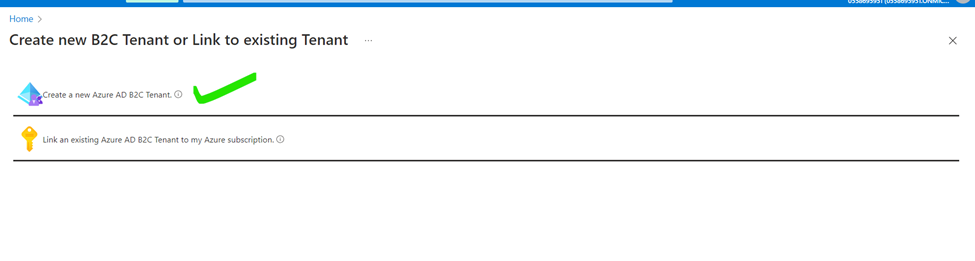
2.      Create B2C tenant  : For B2C AD need to create seperate tenant .

To create B2C Tenants go to home page and search Azure Active Directory B2C  in top search box and click Ok . It will redirect you to a tenant creation screen.


Enter the details click review & create details


Tenant creation takes almost 1 to 2 min . By the time waiting will be good choice instead of refreshing browser. You will see below message after successfully creation of Tenant . Click on link to go to B2C tenant dashboard page.


Tenant Dashboard page


3.      Register App : Next step to register an app and get client Id and configure user flow (signin/signout/singup/password reset ) .I will cover only signup ,sign in and password reset userflow.

Click on App Registration from Left menu and click New Registration. Enter the app name “webb2cexample” rest you can leave default and click Register.

4.      Authentication : Click on the Authentication ->Add a Platform ->choose Web


5.      You need to Configure web as below  

Redirect URIs : since you have not created any application then lets put some dummy url/keep blanck , later we can update this.

Check below both highlighted check box. Access token Id Token and click configure.


 6.      Configure User flow (in previous version it was policies)

Go to B2C tenant and click on User Flow from left menu


You will see below dashboard for user flow . Select Sign up and Sign In and recommended as below .Click on create button.


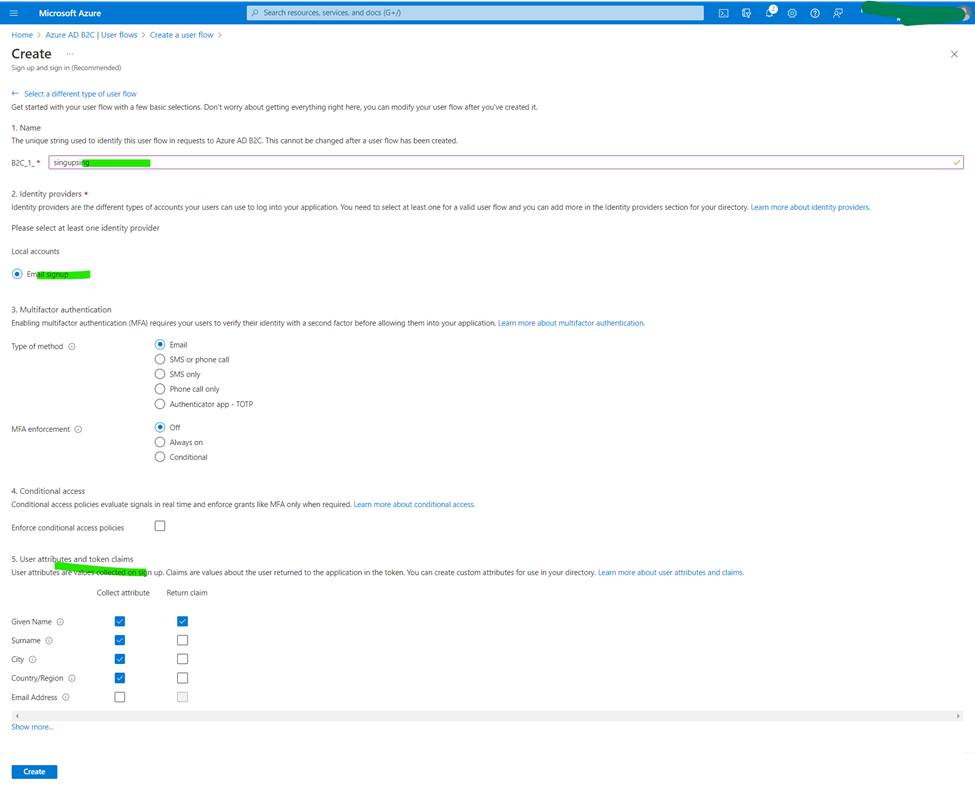
In next screen you need to setup some configuration for sign up and sign in form which will be rendered by Microsoft identity to you application .

1.      Name : It is policies name which need to defined to render form for selected properties.  

enter   singupsing

2.      Identity Provider : Unique field for user which he cannot change after registration : check the radio button

3.      Multifactor authentication : leave as it is.

4.      Conditional Access : leave as it is.

5.      User Attribute and Claim : You  need to select what you need to capture on sign up screen and what you want to return as a claim with token. Choose what you need and create.     User Attribute can be added more ,which I will take through in part 4.


After creation of user flow, you can see in the list. Copy this user flow name somewhere in your local .


 Similarly, you can create new User Flow for Password reset. Which I am not going to create here. For each activity like Password Change ,sign up & sign in ,edit profile you need to create flow.

Alright, I think we have done with configuration from azure side. Let’s move to visual studio and see how to implement this.

Implement Azure AD B2C Authentication in .Net Core MVC App

1.      Create Web App : Open Visual studio and create .Net Core web App(MVC) enter project name :” AzureB2CExamples”  .On next screen select Authentication type : “Microsoft Identity Type” then click create.


If you explore solution explorer you can see  automatically required NuGet Packages and setup configuration will be added when we select Identity type.

NuGet Packages: 


2.      Open appsettings.json file and replace AzureAd config as below

        {
       
          "AzureAdB2C": {
        "Instance": "<<your tenant url>>",
            "TenantId": "Tenant Id",
            "ClientId": "Client Id",
            "Domain": "Doman Name",
            "SignUpSignInPolicyId": "B2C_1_singupsing",
            "CallbackPath": "/signin-oidc" // "defaults to /signin-oidc you can replace what you want
          },
      "Logging": {
        "LogLevel": {
              "Default": "Information",
          "Microsoft": "Warning",
          "Microsoft.Hosting.Lifetime": "Information"
            }
          },
          "AllowedHosts": "*"
    }

Details can be copied from

For instance, copy url from below screen


3. open Startup.cs and replace with the below code

 using Microsoft.AspNetCore.Authentication.OpenIdConnect;

using Microsoft.AspNetCore.Builder;
using Microsoft.AspNetCore.Hosting;
using Microsoft.Extensions.Configuration;
using Microsoft.Extensions.DependencyInjection;
using Microsoft.Extensions.Hosting;
using Microsoft.Identity.Web;
using Microsoft.Identity.Web.UI;

namespace AzureB2CExamples
{
    public class Startup
    {
        public Startup(IConfiguration configuration)
        {
            Configuration = configuration;
        }

        public IConfiguration Configuration { get; }

        // This method gets called by the runtime. Use this method to add services to the container.
        public void ConfigureServices(IServiceCollection services)
        {
         
            services.AddAuthentication(OpenIdConnectDefaults.AuthenticationScheme)
                .AddMicrosoftIdentityWebApp(Configuration.GetSection("AzureAdB2C"));

            services.AddControllersWithViews();
            services.AddRazorPages()
                 .AddMicrosoftIdentityUI();
             
        }

        // This method gets called by the runtime. Use this method to configure the HTTP request pipeline.
        public void Configure(IApplicationBuilder app, IWebHostEnvironment env)
        {
            if (env.IsDevelopment())
            {
                app.UseDeveloperExceptionPage();
            }
            else
            {
                app.UseExceptionHandler("/Home/Error");
                // The default HSTS value is 30 days. You may want to change this for production scenarios, see https://aka.ms/aspnetcore-hsts.
                app.UseHsts();
            }
            app.UseHttpsRedirection();
            app.UseStaticFiles();

            app.UseRouting();

            app.UseAuthentication();
            app.UseAuthorization();

            app.UseEndpoints(endpoints =>
            {
                endpoints.MapControllerRoute(
                    name: "default",
                    pattern: "{controller=Home}/{action=Index}/{id?}");
                endpoints.MapRazorPages();
            });
        }
    }
}

4. copy the below url which you need to enter in Redirect uris with callbackpath  defined in appsettings.json.


Go To Registered app and update url as below and save.


Now If you run the application you will see default created home page.


Click on Sign In it will redirects to Microsoft default Sign In Page. Which Looks like below.


Similarly, you can click on Sign up link which Redirect you to sign up page , and you can see all the user attribute whatever you chosen while creating user flow.


Note : All the redirection for sign In/Sign out handled By Microsoft.Identity.Web.UI nuget package. Which has Account controller in which all required action is defined. 

Just need to define action and controller wherever is required . you can see in _LoginPartial.cshtml.

Let’s register one user and get the user details.

Add one menu on Application home page to show user details after sign in.

·       Open _layout.cshtml and add below menu


·       Go to HomeController and add below Actions with view named “MyProfiles”

       [Authorize] // when you try to call this action, system will check your           authentication and redirect to sign in page. 

        public IActionResult MyProfiles()

        {

            return View();

        }


Now Home page looks like


Click on SignIn ->SignUp and register a user .Make sure you are entering valid email id because you will get verification code

Enter your email Id and click on send verification code , after receiving code enter and click on verify code. After that fill up all the below fields and click on Create button.


After successful registration you will be redirected to localhost Home Page with authenticated user.


 Now Let’s see added user in azure b2c tenant

Login in azure portal and go to your B2C tenant dashboard and click users from left menu


In user list you can see your registered user


User can be managed directly from azure portal also .

Alright let’s get the logged in user details -Go to web app and open myprofiles view and update the below code

@using System.Security.Claims

@{

    ViewData["Title"] = "MyProfiles";

}


<h1>MyProfiles</h1>


<table class="table-hover table-striped">

    <tr>

        <th> Type</th>

        <th> Value</th>

    </tr>


    @foreach (Claim claim in User.Claims)

    {

        <tr>

            <td>@claim.Type</td>

            <td>@claim.Value</td>

        </tr>

}

</table>

Now run your web app and click on My Profile ,you can see below output.


That’s It . you are done with this part. In next part will see how to change signin/signup page to make seamless user experience.

you can download all the azure samples code : https://github.com/mkumar8184/azure-sdk-services-samples

Convert Html to Pdf in azure function and save in blob container

 In this post  I am going to create an azure function ( httpTrigger ) and send html content  which will be converted into PDF and save in bl...