Sunday, July 24, 2022

.Net Core Web API Authentication and Authorization using Azure AD

In this tutorial  we are going to see how .Net Core web api can be secured and use by client application using Azure Ad Token.

Scenario - Assume we have one .Net core Client Web App which need to get token from Azure Ad and pass to .Net Core web api . 


To achieve above follow below in steps:

1. Create Web App

2. Authenticate web app and Get Token from Azure AD

3. Pass to Web Api , Web Api should also validate that token from AD and return the result.

Alright ,Lets do it in steps wise

Steps 

Azure AD Configuration for Apps

1. Login to Azure Portal and Register WebApi Project 

Go to Home -> Azure Active Directory -> App Registration from Left Menu and enter detail as below


Enter App Name "WebApiApp" and click on register rest you can leave as it is.


2. From Left menu in registered app click expose Api and click set . this will create a application Id url resource link


click on save ,Now you will have Application(client) ID ,copy somewhere in local will use it later

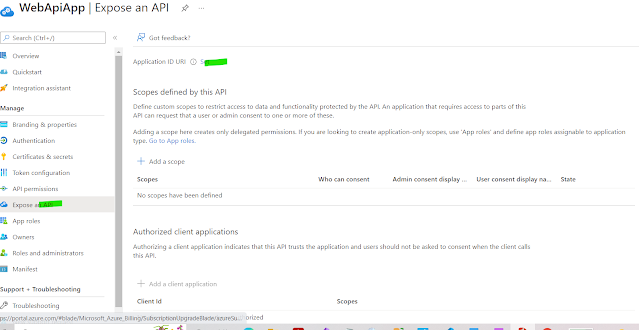
Now Lets create app roles so that in API we can allow to read/write permission. Note : here we are giving access on applications level,  not to any user or group.

3. Click App Roles from Left menu -> Create App Role -> enter details as per requirement .Here I am going create role to read data only


Display Name : Api.ReadOnly( you can add anything )

Member Type : Application 

Value - Api.ReadOnly (keep Same as Display name - but not necessary)

Description - enter  description ,you can enter same text or different.

Check enable the role and click Apply. New App Roles will be created and enabled.

Similarly you can create different roles as per your use.

Here we are done all the configuration which is required to access api .

Lets Register new client app which will call this api. Follow same process what you did for ApiApp.

1. Click on Register App -> New Registration .

2.Enter App name and Click Register. I entered app name "ClientAppForApi"


3. Click on API Permission from Left Menu from registered app and Click Add  permission.


4 .Click on myApis and select "WebApiApp" check the app role and click on add permission.

You can see added role in the list. Above of the list click on "Grand Admin consent " and click ok. Since this is application level member access so no need to change another things. Provide admin consent by click Grant admin.


Before moving to next steps, click on certificate and secret form left menu and create and copy the client secret value somewhere in local.


Finished the azure configuration part .Lets open the visual studio and create 2 app .

Web Api & Client Application in Visual Studio 

1. Web Api
2. .Net core client App

1. Open Visual Studio ->create new project ->Asp.Net core web api -> name "WebApiADToken" next ->Create.


2. Install NuGet Package 
Microsoft.Identity.web


3. Open appsettings.json and add below highlighted code and replace your value

{

  "Logging": {

    "LogLevel": {

      "Default": "Information",

      "Microsoft": "Warning",

      "Microsoft.Hosting.Lifetime": "Information"

    }

  },

  "AzureAd": {

    "Instance": "https://login.microsoftonline.com",

    "TenantId": "<<TenantId>>",

    "ClientId": "<<ClientId>>"

  },

  "AllowedHosts": "*"

}

4. Open Startup.cs and add below highlighted code


using Microsoft.AspNetCore.Builder; 

using Microsoft.AspNetCore.Hosting;
using Microsoft.Extensions.Configuration;
using Microsoft.Extensions.DependencyInjection;
using Microsoft.Extensions.Hosting;
using Microsoft.Identity.Web;
using Microsoft.OpenApi.Models;
 
namespace WebApiADToken
{
    public class Startup
    {
        public Startup(IConfiguration configuration)
        {
            Configuration = configuration;
        }
 
        public IConfiguration Configuration { get; }
 
        // This method gets called by the runtime. Use this method to add services to the container.
        public void ConfigureServices(IServiceCollection services)
        {
            services.AddMicrosoftIdentityWebApiAuthentication(Configuration);
            services.AddControllers();
            services.AddSwaggerGen(c =>
            {
                c.SwaggerDoc("v1", new OpenApiInfo { Title = "WebApiADToken", Version = "v1" });
            });
        }
 
        public void Configure(IApplicationBuilder app, IWebHostEnvironment env)
        {
            if (env.IsDevelopment())
            {
                app.UseDeveloperExceptionPage();
                app.UseSwagger();
                app.UseSwaggerUI(c => c.SwaggerEndpoint("/swagger/v1/swagger.json", "WebApiADToken v1"));
            }
 
            app.UseHttpsRedirection();
 
            app.UseRouting();
            app.UseAuthentication();
            app.UseAuthorization();
 
            app.UseEndpoints(endpoints =>
            {
                endpoints.MapControllers();
            });
        }
    }
}

 5. Open Default create controller "WeatherForecastController" and replace with below code . If you want to create new controller you can create and change the Get method as shown.

using Microsoft.AspNetCore.Authorization;
using Microsoft.AspNetCore.Mvc;
using Microsoft.Extensions.Logging;
using System;
using System.Collections.Generic;
using System.Linq;
 
namespace WebApiADToken.Controllers
{
    [ApiController]
    [Route("[controller]")]
  
    public class WeatherForecastController : ControllerBase
    {
        private static readonly string[] Summaries = new[]
        {
            "Freezing", "Bracing", "Chilly", "Cool", "Mild", "Warm", "Balmy", "Hot", "Sweltering", "Scorching"
        };
 
        private readonly ILogger<WeatherForecastController> _logger;
 
        public WeatherForecastController(ILogger<WeatherForecastController> logger)
        {
            _logger = logger;
        }
//replace this code
        [HttpGet]
        [Authorize(Roles ="Api.ReadOnly")]  //here we are checking authorization
        public IEnumerable<WeatherForecast> Get()
        {
            var rng = new Random();
            return Enumerable.Range(1, 5).Select(index => new WeatherForecast
            {
                Date = DateTime.Now.AddDays(index),
                TemperatureC = rng.Next(-20, 55),
                Summary = Summaries[rng.Next(Summaries.Length)]
            })
            .ToArray();
        }
    }
}

 6. Create new Asp.Net core web application project named "ClientAppForApi"  


7. Open appsettings.json and replace with below code

{
    "AzureAdConfig": {
      "Instance": "https://login.microsoftonline.com/{{tenanatId}}",
      "TenantId": "<<tenant Id>>",
      "ClientId": "<<Client Id>>",
      "ClientSecret": "<<secriet>>"
    },
"ApiSource": { "Resource": "api://d61c615b-54c8-45e2-996e-a7999668fd84", "ApiBaseUrl": "https://localhost:44393/" // this is web api url },
    "Logging": {
      "LogLevel": {
        "Default": "Information",
        "Microsoft": "Warning",
        "Microsoft.Hosting.Lifetime": "Information"
      }
    },
    "AllowedHosts": "*"
  }


Before moving to the next steps we need to add NuGet Package

Microsoft.IdentityModel.Clients.ActiveDirectory

8. Add Service class where we will get token and pass to web api to get data

Create Class named :"ExternalApiService" and add below code

using Microsoft.Extensions.Configuration;
using Microsoft.IdentityModel.Clients.ActiveDirectory;
using Newtonsoft.Json;
using System.Collections.Generic;
using System.Net.Http;


namespace ClientAppForApi
{
// Added interface
    public interface IExternalApiService
    {
        public List<WheatherResult> GetWheater();
    }
    public class ExternalApiService: IExternalApiService
    {
        private readonly HttpClient _httClient;      
        private readonly IConfiguration _configuration;
        private readonly AuthenticationContext _authenticationContext;
        private readonly ClientCredential _clientCredential;
        public ExternalApiService(HttpClient httpClient,
            IConfiguration configuration)
        {
            _httClient = httpClient;
            _configuration = configuration;
            _authenticationContext = new AuthenticationContext(_configuration["AzureAd:Instance"]);
            _clientCredential = new ClientCredential(_configuration["AzureAd:ClientId"], _configuration["AzureAd:ClientSecret"]);
        }
        public List<WheatherResult> GetWheater()
        {
            var token = GenerateToken();
            if (token == null || string.IsNullOrWhiteSpace(token.AccessToken))
            {
                throw new AdalServiceException("","Invalid Response");
            }
            _httClient.DefaultRequestHeaders.Add("Authorization", "Bearer " + token.AccessToken);
            var response = _httClient.GetAsync(_configuration["ApiSource:ApiBaseUrl"]+ "WeatherForecast").Result;
            var responseContent =  response.Content.ReadAsStringAsync().Result;
            var result = JsonConvert.DeserializeObject<List<WheatherResult>>(responseContent);
            return result;
        }

        private AuthenticationResult GenerateToken()
        {
            return _authenticationContext.AcquireTokenAsync(_configuration["ApiSource:Resource"], _clientCredential).Result;          
        }


    }
}

9. Add below line in Startup.cs

 services.AddHttpClient<IExternalApiService, ExternalApiService>();


using Microsoft.AspNetCore.Builder;
using Microsoft.AspNetCore.Hosting;
using Microsoft.Extensions.Configuration;
using Microsoft.Extensions.DependencyInjection;
using Microsoft.Extensions.Hosting;

namespace ClientAppForApi
{
    public class Startup
    {
        public Startup(IConfiguration configuration)
        {
            Configuration = configuration;
        }

        public IConfiguration Configuration { get; }

       
        public void ConfigureServices(IServiceCollection services)
        {
            services.AddHttpClient<IExternalApiService, ExternalApiService>();
            services.AddControllersWithViews();
        }

     
        public void Configure(IApplicationBuilder app, IWebHostEnvironment env)
        {
            if (env.IsDevelopment())
            {
                app.UseDeveloperExceptionPage();
            }
            else
            {
                app.UseExceptionHandler("/Home/Error");
                // The default HSTS value is 30 days. You may want to change this for production scenarios, see https://aka.ms/aspnetcore-hsts.
                app.UseHsts();
            }
            app.UseHttpsRedirection();
            app.UseStaticFiles();

            app.UseRouting();
         
            app.UseAuthorization();

            app.UseEndpoints(endpoints =>
            {
                endpoints.MapControllerRoute(
                    name: "default",
                    pattern: "{controller=Home}/{action=Index}/{id?}");
            });
        }
    }
}


10. Open HomeController.cs  and replace below code.

using ClientAppForApi.Models;
using Microsoft.AspNetCore.Mvc;
using Microsoft.Extensions.Logging;
using System.Diagnostics;

namespace ClientAppForApi.Controllers
{

    public class HomeController : Controller
    {
        private readonly ILogger<HomeController> _logger;
        private readonly  IExternalApiService  _externalApiService;
        public HomeController(ILogger<HomeController> logger, IExternalApiService externalApiService)
        {
            _logger = logger;
            _externalApiService = externalApiService;
        }

        public IActionResult Index()
        {
          var result=   _externalApiService.GetWheater();        
           return View(result);
        }

        public IActionResult Privacy()
        {
            return View();
        }

        [ResponseCache(Duration = 0, Location = ResponseCacheLocation.None, NoStore = true)]
        public IActionResult Error()
        {
            return View(new ErrorViewModel { RequestId = Activity.Current?.Id ?? HttpContext.TraceIdentifier });
        }
    }
}

11. Open Index.cshtml and replace with below code

@{
    ViewData["Title"] = "Home Page";
}
@model List<WheatherResult>;
<div class="text-center">
    <h1 class="display-4">Welcome To API Call through Azure AD Token (Client app to web api)</h1>
   
</div>
@foreach (var item in Model)
{
<ul>
    <li>Date : @item.Date</li>
    <li>TemperatureC :@item.TemperatureC</li>
    <li>TemperatureF :@item.TemperatureF</li>
    <li>Summary : @item.Summary</li>
</ul>

}


12. Add one result class which I forgot to add above to deserialize webapi result. 

using System;

namespace ClientAppForApi
{
    public class WheatherResult
    {
     
            public DateTime Date { get; set; }

            public int TemperatureC { get; set; }

            public int TemperatureF => 32 + (int)(TemperatureC / 0.5556);

            public string Summary { get; set; }
       
    }
}

We are done with coding part lets test it.

1. I have created both project in same solution so I am goint to run both together . Otherwise you just need to make sure run webapi project first then run client app. To run both app together click on solution property and select multiple startup project and set start for required both project.


If everything successful the on Index.cshtml you will see the result -


So just to summarized above - 

ClientAppForApi -> HomeController ->Index->call externalApiservice -> GenerateToken(token gets from azure)->pass received token to our web api project to call endpoint ->WeatherForecastController -> and deserialized response in object -> return on index page.


That's it. we are done with a little long exercise to secure web api from client app.


No comments:

Post a Comment

Thanks for your valuable comments

Convert Html to Pdf in azure function and save in blob container

 In this post  I am going to create an azure function ( httpTrigger ) and send html content  which will be converted into PDF and save in bl...