Friday, August 26, 2022

Get user list & details using Micorsoft graph api in c#

 In previous post I have shown how to use MS Graph Api to create users in Azure AD. Now Lets see how we can fetch and filter users using MS Graph Api. Go through the Setup Graph Api for uses of microsoft Graph Api from starting. This blog is continuous of the previous blog. To create project see Setup Graph Api.

Get All User By Page size 

Create class "UserData": For mapping Azure Ad user data.

 public class UserData
    {
        public string GivenName { get; set; }
        public string SurName { get; set; }
        public string Id { get; set; }
        public IEnumerable<ObjectIdentity> Identities { get; set; }
        public string DisplayName { get; set; }
        public string Email { get; set; }
        public string Country { get; set; }
        public string EmployeeId { get; set; }      
    }

Create another class "UserList" and paste below code


    public class UserList
    {
        public List<UserData> Users { get; set; }
        public string SkipToken { get; set; }     //in user object graph api return
//token for next paging ,if it reaches last token will be null  

    }

Now in your controller paste the below code

  [HttpGet]
        [Route("user-list")]
        public async Task<IActionResult> GetAllRegisterdUser(int pageSize=5,string pageNumer="")
        {
            var _graphClient = await GraphClientHelper.GetGraphApiClient(_configuration);
            var userList = new UserList();
            var queries = new List<QueryOption>();
            queries.Add(new QueryOption("$count","true"));
            queries.Add(new QueryOption("$top", pageSize.ToString()));        
            if (!string.IsNullOrWhiteSpace(pageNumer))
            {
                queries.Add(new QueryOption("$skiptoken", pageNumer));
            }

           var result = await _graphClient.Users
              .Request(queries)  
              //use if you need selected data
              .Select(x => new
              {
                  x.DisplayName,
                  x.Id,
                  x.Identities,
                  x.GivenName,
                  x.Mail,
                  x.Country,
                  x.Surname,
                  x.EmployeeId
              }).GetAsync();

            var data = result.CurrentPage.Select
                (p => new UserData
                {
                    DisplayName = p.DisplayName,
                    Country = p.Country,
                    Email = p.Mail,
                    EmployeeId = p.EmployeeId,
                    GivenName = p.GivenName,
                    Id = p.Id,
                    Identities = p.Identities,
                    SurName = p.Surname,
                }).ToList();

            userList.Users = data;
            userList.SkipToken = result.NextPageRequest?.QueryOptions?.FirstOrDefault(x =>
                       string.Equals("$skiptoken", x.Name, StringComparison.InvariantCultureIgnoreCase))?.Value;        


            return Ok(userList);

        }


Get user by search text :

 [HttpGet]
        [Route("user-search/{searchItem}")]
        public async Task<IActionResult> GetUserBySearch(string searchItem="",int pageSize = 5, string pageNumer = "")
        {
            var _graphClient = await GraphClientHelper.GetGraphApiClient(_configuration);
            var userList = new UserList();

            var queries = new List<QueryOption>();          
            queries.Add(new QueryOption("$top", pageSize.ToString()));
            if (!string.IsNullOrWhiteSpace(pageNumer))
            {
                queries.Add(new QueryOption("$skiptoken", pageNumer));
            }

            var result = await _graphClient.Users
               .Request(queries)
               .Filter(SetFilter(searchItem))
               //use if you need selected data
               .Select(x => new
               {
                   x.DisplayName,
                   x.Id,
                   x.Identities,
                   x.GivenName,
                   x.Mail,
                   x.Country,
                   x.Surname,
                   x.EmployeeId
               }).GetAsync();

            var data = result.CurrentPage.Select
                (p => new UserData
                {
                    DisplayName = p.DisplayName,
                    Country = p.Country,
                    Email = p.Mail,
                    EmployeeId = p.EmployeeId,
                    GivenName = p.GivenName,
                    Id = p.Id,
                    Identities = p.Identities,
                    SurName = p.Surname,
                }).ToList();

            userList.Users = data;
            userList.SkipToken = result.NextPageRequest?.QueryOptions?.FirstOrDefault(x =>
                       string.Equals("$skiptoken", x.Name, StringComparison.InvariantCultureIgnoreCase))?.Value;


            return Ok(userList);

        }

 private string SetFilter(string searchItem)
        {
            if (string.IsNullOrWhiteSpace(searchItem))
            {
                return string.Empty;
            }

            return $"startswith(givenName, '{searchItem}')" +
                   $" or startswith(surname, '{searchItem}')"+
                    $" or startswith(displayName, '{searchItem}')" ;
         
        }


Get user by Email Id / Identity  :

[HttpGet]
        [Route("search-by-email/{emailId}")]
        public async Task<IActionResult> GetUserByEmail(string emailId)
        {
            var _graphClient = await GraphClientHelper.GetGraphApiClient(_configuration);
            var userList = new UserList();

            var result = await _graphClient.Users
               .Request()
               .Filter($"identities/any(c:c/issuerAssignedId eq '{emailId}' and c/issuer eq '{tenant url}') ")
               .Select(x => new
               {
                   x.DisplayName,
                   x.Id,
                   x.Identities,
                   x.GivenName,
                   x.Mail,
                   x.Country,
                   x.Surname,
                   x.EmployeeId
               }).GetAsync();
            return Ok(result);

        }


Get user by User Id:

 [HttpGet]
        [Route("search-by-Id/{userId}")]
        public async Task<IActionResult> GetUserById(string userId)
        {
            var _graphClient = await GraphClientHelper.GetGraphApiClient(_configuration);
            var result = await _graphClient.Users[userId]
               .Request()
               .GetAsync();
            return Ok(result);

        }


await GraphClientHelper.GetGraphApiClient(_configuration); //to configure this you follow Setup Graph Api.


 you can download all the azure samples code : https://github.com/mkumar8184/azure-sdk-services-samples

Wednesday, August 24, 2022

Create, update ,delete, deactivate User in Azure AD B2C using Microsoft Graph Api

User creation using Microsoft Graph Api in Azure AD B2C.

Scenario - A company is using Azure AD B2C to manage application access  for its customer. Admin registers customer through application. While registering customer need to save user details to AZURE AD and Application DB . Later customer can be authenticated/Authorized for application. Admin manages users in Azure AD B2C.

In order to achieve above scenario I will use Microsoft Graph and .Net Core web api .

Microsoft Graph :It is a RESTful web API that enables to access all  Microsoft Cloud service resources. It uses Http methods to call api.

Steps :
1. Register an application to Azure AD B2C
2. Api Permission to Microsoft Graph 
3. Create Web Api 

Register an application to Azure AD B2C :

Go to azure portal -> Azure AD B2C tenant -> Click on App Registration from Left menu.
Follow this link if you want to create tenant from starting.


Click +New Registration .
In new screen fill the app name "MSGraphAppTest" and click Register. All Other field leave default .


Go to registered app and click on Client & Secret from left menu  .
Click New client secret ->enter name and choose expiry ,click on Add .
Added client secret will be added in list .Copy the value of the client secret and save somewhere in your local before leaving this window.


Api Permission to Microsoft Graph 

Click on Api Permission from Left menu -> Add a permission . you can see first tab is Microsoft graph ,this is what you need to use. Here you need to give permission to MS Graph api .


Click on Microsoft graph-> Application Permission -> search "User" you will see User .Under User permission check User.ReadWrite.All then click Add Permission.


Once permission added you need to grant admin consent .


Before leaving ,lets copy Application Client Id ,tenant Id  .Click on overview and copy below ,save in local file .


Create Web Api 

Open visual studio ->create .Net core web api  named  "MsGraphAzureAdTest" .


Go to Nuget package manager and install


Open appsettings.json file and replace with below code 

{
  "B2CUserSettings": {
    "Tenant": "<<tenant name>>.onmicrosoft.com",
    "ClientId": "<<ClienId>>",
    "ClientSecret": "<<secret>>",
    "B2CExtensionAppClientId": "<<extensionClientId>>"
  },
  "Logging": {
    "LogLevel": {
      "Default": "Information",
      "Microsoft": "Warning",
      "Microsoft.Hosting.Lifetime": "Information"
    }
  },
  "AllowedHosts": "*"
}


Create "RegisterUser" class and paste below code

using Microsoft.Graph;
using Newtonsoft.Json.Linq;

namespace MsGraphAzureAdTest
{
    public class RegisterUser
    {
//input from UI
        public string FirstName { get; set; }
        public string LastName { get; set; }
        public string Email { get; set; }
        public string EmployeeId { get; set; }
        public string CompanyCode { get; set; }
        public string CompanyName { get; set; }
        public string JobTitle { get; set; }
        public string Location { get; set; }

//set Data in User object and return
        public User SetUserData(
            string extensionClientId,
            string tenant)
        {
            var extension = "extension_" + extensionClientId;

            var jsonObject = new JObject
            {
                {"accountEnabled", true},
                {"country", "India"},
                {"creationType", "LocalAccount"},
                {"givenName",FirstName},
                {"surName",LastName},
                {$"{extension}_CompanyCode", CompanyCode},//custom attribute
                {$"{extension}_CompanyName", CompanyName},  //custom attribute            
                {"displayName", FirstName + " " + LastName},
                {"passwordPolicies", "DisablePasswordExpiration,DisableStrongPassword"},
                {"passwordProfile", new JObject
                {
                    {"password", "abc@123"},
                    {"forceChangePasswordNextLogin", false}
                } },
                {"Identities", new JArray
                    {
                        new JObject
                        {
                            {"signInType",  "emailAddress"},
                            {"issuer",tenant},
                            {"IssuerAssignedId",Email }
                        }
                    } }
                };

            return jsonObject.ToObject<User>();
        }
    }
}


Create new class "GraphClientHelper" and paste below code
using Microsoft.Extensions.Configuration;
using Microsoft.Graph;
using Microsoft.IdentityModel.Clients.ActiveDirectory;
using System.Net.Http.Headers;
using System.Threading.Tasks;
namespace MsGraphAzureAdTest
{
    public class GraphClientHelper
    {
        public static async Task<GraphServiceClient> GetGraphApiClient(IConfiguration _configuration)
        {
            var clientId = _configuration["B2CUserSettings:ClientId"];
            var secret = _configuration["B2CUserSettings:ClientSecret"];
            var domain = _configuration["B2CUserSettings:Tenant"];

            var credentials = new ClientCredential(clientId, secret);
            var authContext =
                new AuthenticationContext($"https://login.microsoftonline.com/{domain}/");
            var token = await authContext
                .AcquireTokenAsync("https://graph.microsoft.com/", credentials);

            var graphServiceClient = new GraphServiceClient(new DelegateAuthenticationProvider((requestMessage) =>
            {
                requestMessage
                    .Headers
                    .Authorization = new AuthenticationHeaderValue("bearer", token.AccessToken);

                return Task.CompletedTask;
            }));

            return graphServiceClient;
        }
    }
}


Add a new controller named "UserManagerController" and add below code


CREATE USER


using Microsoft.AspNetCore.Mvc;
using Microsoft.Extensions.Configuration;
using Microsoft.Extensions.Logging;
using System.Threading.Tasks;

namespace MsGraphAzureAdTest.Controllers
{
    [ApiController]
    [Route("[controller]")]
    public class UserManagerController : ControllerBase
    {

        private readonly ILogger<WeatherForecastController> _logger;
        private readonly IConfiguration _configuration;
        public UserManagerController(ILogger<WeatherForecastController> logger,
            IConfiguration configuration)
        {
            _logger = logger;
            _configuration = configuration;
        }

        [HttpPost]
        public async Task<IActionResult> RegisterUser([FromBody] RegisterUser command)
        {
            var _graphClient =await GraphClientHelper.GetGraphApiClient(_configuration);
            // Create user
            var user = command.SetUserData(_configuration["B2CUserSettings:B2CExtensionAppClientId"], _configuration["B2CUserSettings:Tenant"]);
            if (user == null)
            {
                return BadRequest($"Error in setting user data in graph api");
            }
            var result = await _graphClient.Users
            .Request()
            .AddAsync(user);
            if (result == null)
            {
                return BadRequest($"Unsuccesful attempt to create user {command.Email}");

            }

            //Logic to save extra data in db

            return Ok();

        }


    }
}


Run your web api and submit through swagger.


Go to azure portal -> Active Directory B2C and click users from left menu . you can see added user in the user list.


UPDATE USER :

 User details can be updated as below , If you want to disable or enable account for login , update AccountEnabled property.

   [HttpPut]
         public async Task<IActionResult> UpdateUser(string userId,bool enabled=true)
        {
            var _graphClient =  GraphClientHelper.GetGraphApiClient2(_configuration);
            var user = await _graphClient.Users[userId]
             .Request()
             .GetAsync();
            if (user == null)
            {
                return BadRequest($"Error in setting user data in graph api");
            }

            user.AccountEnabled = enabled; // this will decativate the user from login
            user.Mail = "test@g.com";
            return Ok( await _graphClient.Users[userId]
            .Request()
            .UpdateAsync(user));

        }

After updating AccountEnabled as false ,user signIn will be blocked .


DELETE USER :


   [HttpDelete]      
        public async Task<IActionResult> DeleteUser(string userId)
        {
            var _graphClient = GraphClientHelper.GetGraphApiClient2(_configuration);
              await _graphClient.Users[userId]
                   .Request()
                   .DeleteAsync();
            return Ok();

        }


We finished all the operation on user object by using MS Graph Api. In next tutorial will see how we can query on user to get and filter users.

 you can download all the azure samples code : https://github.com/mkumar8184/azure-sdk-services-samples


Sunday, August 21, 2022

Azure AD B2C :customize user claim in .net core

 Azure AD B2C provides user attributes to customize/add new attribute for user details. 

Think about a scenario where you are authenticating user from Azure Ad and need to get user's role which you are maintaining in you application DB/any other source. Upon Successful sign In you need to return application role in a claim to client . 

Here I am assuming that you have already configured Azure B2C sign In Policy  and  able to login through your application successfully. Go through Sign In in Azure B2C to setup sign in user flow.

Let's see how we can achieve the above :

  1. Create Signin policy and call through app : this you can follow complete Sign In in Azure  B2C 

  2 .   Create a custom user attribute in Azure AD

  3 . Create an api : return user role from our db/or any source , I will be using a dictionary for role instead of DB for demo purpose.

Api Connector : Microsoft provides a feature to link an web api /web service and get the  custom claim data.

Lets see above step one by one in details :

Create custom attribute :

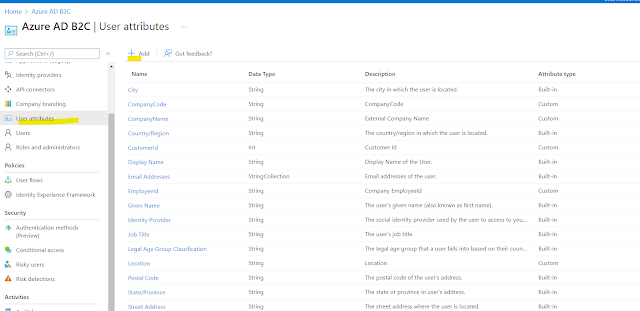
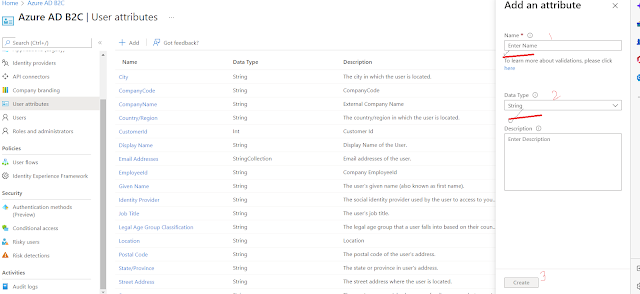
 1. Go to azure portal , switch B2C directory -> select user attributes -> click on Add 


Enter UserRoles in Name and choose String in Datatype , Enter Description and click on Create. Once it create successffully you can see this custom attribute in the list.


here UserRoles is a custom attribute for which value will be set from our application DB and return back as user claim to the Client.

Go to the left menu and select user flow , from the list you select your flow which you have created for signin.


From Left menu select Application claim then check the custom attribute "UserRoles"

 and click save .


Create Web Api

Open Visual studio and add new web api project . Create web api project with "CustomClaimApi"


Add a folder called ADUserManage  and create class called "ApiConnectorAuthorization"  to authorized the api call from azure.

ApiConnectorAuthorization :

using Microsoft.AspNetCore.Http;
using Microsoft.Extensions.Configuration;
using System;

namespace CustomClaimApi.ADUserManage
{
    public class ApiConnectorAuthorization
    {
        public static bool IsAuthorizedByBasicAuth(HttpRequest req, IConfiguration _configuration)
        {
            string username = _configuration["ApiConnectorCred:UserName"];//replace your user name
            string password = _configuration["ApiConnectorCred:Password"];// replace your password
            if (!req.Headers.ContainsKey("Authorization"))
            {
                return false;
            }
            var auth = req.Headers["Authorization"].ToString();
            if (!auth.StartsWith("Basic "))
            {
                return false;
            }
            var cred = System.Text.Encoding.UTF8.GetString(Convert.FromBase64String(auth.Substring(6))).Split(':');
            return (cred[0].ToUpper() == username.ToUpper() && cred[1].ToUpper() == password.ToUpper());
        }
    }
}

Create a new class "ClaimResponse" and paste the below code :

using System.Text.Json.Serialization;

namespace CustomClaimApi.ADUserManage
{
    public class ClaimResponse
    {
        public const string ApiVersion = "1.0.0";
        public const string DefaultValidationError = "ValidationError";

        public ClaimResponse(string action, string userMessage)
        {          
            if (action == DefaultValidationError)
            {
                Status = "400";
            }
            Version = ApiVersion;
            Action = action;
            UserMessage = userMessage;
        }
        public ClaimResponse()
        {
            Version = ApiVersion;
            Action = "Continue"; //action tells user flow need to process or stop on the sign in screen
        }

        [JsonPropertyName("version")]
        public string Version { get; }

        [JsonPropertyName("action")]
        public string Action { get; set; }

        [JsonPropertyName("userMessage")]
        public string? UserMessage { get; set; } // message will be displayed in case of failed

        [JsonPropertyName("status")]
        public string? Status { get; set; }

        [JsonPropertyName("extension_UserRoles")] // this is custom attribute which you have to declare here and set value while calling api
        // all the custom attribute has prefix "extension_"
        public string UserRoles { get; set; } = string.Empty;

    }
}

Create new Class "RequestData" and paste below code 

RequestData : Data object , sent by user flow when call your api ,by using this data you can write query and filter user roles . you can use email or you can use object Id(which is azure Ad User Id).

namespace CustomClaimApi.ADUserManage
{
    public class RequestData
    {
        public string step { get; set; } = string.Empty;
        public string client_id { get; set; } = string.Empty;
        public string ui_locales { get; set; } = string.Empty;      
        public string email { get; set; } = string.Empty;
        public string objectId { get; set; } = string.Empty;
        public string surname { get; set; } = string.Empty;
        public string displayName { get; set; } = string.Empty;
        public string givenName { get; set; } = string.Empty;
    }
}

Create service  class called : UserClaimService and paste below code 

using Microsoft.AspNetCore.Http;
using Microsoft.Extensions.Configuration;
using System;
using System.Collections.Generic;
using System.Linq;
using System.Text.Json;
using System.Threading.Tasks;

namespace CustomClaimApi.ADUserManage
{
    public interface IUserClaimService
    {
        Task<ClaimResponse> GetExtraClaims(HttpRequest request);
    }
    public class UserClaimService : IUserClaimService
    {
        private readonly IConfiguration _configuration;
        private const string blockPage = "ShowBlockPage";// in case of any error you must return this action ,
                                                         // by this user flow will be stop and show error whiel sign in process
        public UserClaimService(IConfiguration configuration)
        {
            _configuration = configuration;
        }

        public async Task<ClaimResponse> GetExtraClaims(HttpRequest request)
        {
            if (!ApiConnectorAuthorization.IsAuthorizedByBasicAuth(request, _configuration))
            {
                return new ClaimResponse(blockPage, "Authentication Failed during fetching claim");
            }
            string content = await new System.IO.StreamReader(request.Body).ReadToEndAsync();
            var requestData = JsonSerializer.Deserialize<RequestData>(content);
            if (requestData == null)
            {
                return new ClaimResponse(blockPage, "no data sent by sign in flow");
            }
            string clientId = _configuration["ApiConnectorCred:ClientId"];// validate client
            if (!clientId.Equals(requestData.client_id))
            {
                return new ClaimResponse(blockPage, "Unauthorised access");
            }
            if (string.IsNullOrWhiteSpace(requestData.email))
            {
                return new ClaimResponse(blockPage, "Unauthorised access");
            }

            //filter user role from db/list /dictory
            var userRole = GetUserRole(requestData.objectId);
            var claimResult = new ClaimResponse
            {
                UserRoles = userRole
            };
            return claimResult;
        }

        private string GetUserRole(string objectId)
        {
            //here you can validate user from Db/any source and get user roles and return
            var userRoleDic = new Dictionary<string, string>(){
                {"449d5229-09b6-4704-936e-d2287c53cd45", "Admin, HRAmin"},
                {"645d5229-09b6-4704-936e-d2287c53cd45", "Admin, HRAmin"},
                {"44589-09b6-4704-936e-d2287c53cd45", "Employee, DepartmentManager"}
            };
            return userRoleDic.Where(p => p.Key == objectId).FirstOrDefault().Value;
        }
    }
}

Create new controller named : UserClaimController 

UserClaimController :

using CustomClaimApi.ADUserManage;
using Microsoft.AspNetCore.Mvc;
using System.Threading.Tasks;

namespace CustomClaimApi.Controllers
{
    [ApiController]
    [Route("api/user-claim")]
    public class UserClaimController : ControllerBase
    {
        private readonly IUserClaimService _claimService;
        public UserClaimController(IUserClaimService claimService)
        {
            _claimService = claimService;
        }

        [Route("claims")]
        [HttpPost]
        public async Task<IActionResult> UserClaim()
        {
            var result = await _claimService.GetExtraClaims(Request);
            return Ok(result);
        }

    }

}


Go back to Azure Portal -> B2C Directory select Api Connector to configure our web api end point. 

Note: Localhost url will not be called from api connector so you can use ngrok.exe .This will map your localhost to public uri.

Go to user flow and select Api Connector ,select api connector name from dropdown and click on save.


Run you client and web api together after successful login will will get the claim.

Click Sing In and enter your user Id and password


As soon as azure Ad authenticate you ,before returning to your client app it calls your api which defined in API Connector . you can see debugger in below code


After successfully return from web api ,you will have below claims in httpcontext:


 you can download all the azure samples code : https://github.com/mkumar8184/azure-sdk-services-samples


Convert Html to Pdf in azure function and save in blob container

 In this post  I am going to create an azure function ( httpTrigger ) and send html content  which will be converted into PDF and save in bl...