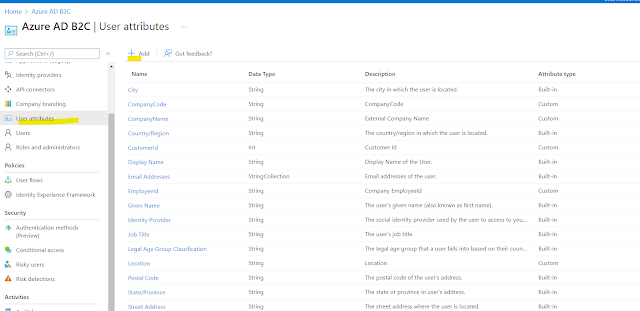
From Left menu select Application claim then check the custom attribute "UserRoles"
and click save .
Create Web Api
Open Visual studio and add new web api project . Create web api project with "CustomClaimApi"
Add a folder called ADUserManage and create class called "ApiConnectorAuthorization" to authorized the api call from azure.
ApiConnectorAuthorization :
using Microsoft.AspNetCore.Http;
using Microsoft.Extensions.Configuration;
using System;
namespace CustomClaimApi.ADUserManage
{
public class ApiConnectorAuthorization
{
public static bool IsAuthorizedByBasicAuth(HttpRequest req, IConfiguration _configuration)
{
string username = _configuration["ApiConnectorCred:UserName"];//replace your user name
string password = _configuration["ApiConnectorCred:Password"];// replace your password
if (!req.Headers.ContainsKey("Authorization"))
{
return false;
}
var auth = req.Headers["Authorization"].ToString();
if (!auth.StartsWith("Basic "))
{
return false;
}
var cred = System.Text.Encoding.UTF8.GetString(Convert.FromBase64String(auth.Substring(6))).Split(':');
return (cred[0].ToUpper() == username.ToUpper() && cred[1].ToUpper() == password.ToUpper());
}
}
}
Create a new class "ClaimResponse" and paste the below code :
using System.Text.Json.Serialization;
namespace CustomClaimApi.ADUserManage
{
public class ClaimResponse
{
public const string ApiVersion = "1.0.0";
public const string DefaultValidationError = "ValidationError";
public ClaimResponse(string action, string userMessage)
{
if (action == DefaultValidationError)
{
Status = "400";
}
Version = ApiVersion;
Action = action;
UserMessage = userMessage;
}
public ClaimResponse()
{
Version = ApiVersion;
Action = "Continue"; //action tells user flow need to process or stop on the sign in screen
}
[JsonPropertyName("version")]
public string Version { get; }
[JsonPropertyName("action")]
public string Action { get; set; }
[JsonPropertyName("userMessage")]
public string? UserMessage { get; set; } // message will be displayed in case of failed
[JsonPropertyName("status")]
public string? Status { get; set; }
[JsonPropertyName("extension_UserRoles")] // this is custom attribute which you have to declare here and set value while calling api
// all the custom attribute has prefix "extension_"
public string UserRoles { get; set; } = string.Empty;
}
}
Create new Class "RequestData" and paste below code
RequestData : Data object , sent by user flow when call your api ,by using this data you can write query and filter user roles . you can use email or you can use object Id(which is azure Ad User Id).
namespace CustomClaimApi.ADUserManage
{
public class RequestData
{
public string step { get; set; } = string.Empty;
public string client_id { get; set; } = string.Empty;
public string ui_locales { get; set; } = string.Empty;
public string email { get; set; } = string.Empty;
public string objectId { get; set; } = string.Empty;
public string surname { get; set; } = string.Empty;
public string displayName { get; set; } = string.Empty;
public string givenName { get; set; } = string.Empty;
}
}
Create service class called : UserClaimService and paste below code
using Microsoft.AspNetCore.Http;
using Microsoft.Extensions.Configuration;
using System;
using System.Collections.Generic;
using System.Linq;
using System.Text.Json;
using System.Threading.Tasks;
namespace CustomClaimApi.ADUserManage
{
public interface IUserClaimService
{
Task<ClaimResponse> GetExtraClaims(HttpRequest request);
}
public class UserClaimService : IUserClaimService
{
private readonly IConfiguration _configuration;
private const string blockPage = "ShowBlockPage";// in case of any error you must return this action ,
// by this user flow will be stop and show error whiel sign in process
public UserClaimService(IConfiguration configuration)
{
_configuration = configuration;
}
public async Task<ClaimResponse> GetExtraClaims(HttpRequest request)
{
if (!ApiConnectorAuthorization.IsAuthorizedByBasicAuth(request, _configuration))
{
return new ClaimResponse(blockPage, "Authentication Failed during fetching claim");
}
string content = await new System.IO.StreamReader(request.Body).ReadToEndAsync();
var requestData = JsonSerializer.Deserialize<RequestData>(content);
if (requestData == null)
{
return new ClaimResponse(blockPage, "no data sent by sign in flow");
}
string clientId = _configuration["ApiConnectorCred:ClientId"];// validate client
if (!clientId.Equals(requestData.client_id))
{
return new ClaimResponse(blockPage, "Unauthorised access");
}
if (string.IsNullOrWhiteSpace(requestData.email))
{
return new ClaimResponse(blockPage, "Unauthorised access");
}
//filter user role from db/list /dictory
var userRole = GetUserRole(requestData.objectId);
var claimResult = new ClaimResponse
{
UserRoles = userRole
};
return claimResult;
}
private string GetUserRole(string objectId)
{
//here you can validate user from Db/any source and get user roles and return
var userRoleDic = new Dictionary<string, string>(){
{"449d5229-09b6-4704-936e-d2287c53cd45", "Admin, HRAmin"},
{"645d5229-09b6-4704-936e-d2287c53cd45", "Admin, HRAmin"},
{"44589-09b6-4704-936e-d2287c53cd45", "Employee, DepartmentManager"}
};
return userRoleDic.Where(p => p.Key == objectId).FirstOrDefault().Value;
}
}
}
Create new controller named : UserClaimController
UserClaimController :
using CustomClaimApi.ADUserManage;
using Microsoft.AspNetCore.Mvc;
using System.Threading.Tasks;
namespace CustomClaimApi.Controllers
{
[ApiController]
[Route("api/user-claim")]
public class UserClaimController : ControllerBase
{
private readonly IUserClaimService _claimService;
public UserClaimController(IUserClaimService claimService)
{
_claimService = claimService;
}
[Route("claims")]
[HttpPost]
public async Task<IActionResult> UserClaim()
{
var result = await _claimService.GetExtraClaims(Request);
return Ok(result);
}
}
}
Go back to Azure Portal -> B2C Directory select Api Connector to configure our web api end point.

Note: Localhost url will not be called from api connector so you can use ngrok.exe .This will map your localhost to public uri.
Go to user flow and select Api Connector ,select api connector name from dropdown and click on save.
Run you client and web api together after successful login will will get the claim.
Click Sing In and enter your user Id and password
As soon as azure Ad authenticate you ,before returning to your client app it calls your api which defined in API Connector . you can see debugger in below code
After successfully return from web api ,you will have below claims in httpcontext:
you can download all the azure samples code : https://github.com/mkumar8184/azure-sdk-services-samples


No comments:
Post a Comment
Thanks for your valuable comments